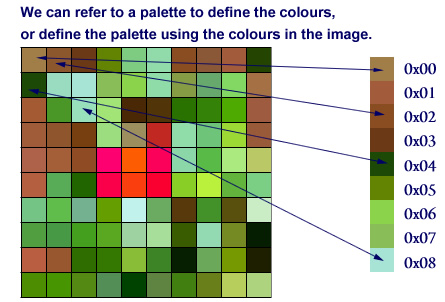
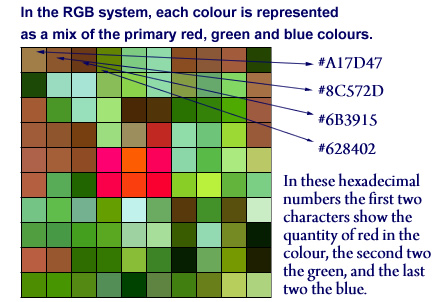
As an image is captured and a grid of colour samples built up, each grid location’s colour needs to be given a representative number. Yes, we’re finally getting back to numbers again!
Like a painter, when dealing with images the computer uses a palette. The palette contains the colour information for the picture, and, like the painter’s palette, forms the basis for creating the image. The image data can be developed from one of many existing predefined computer colour palettes, or, as in this example, a palette of colours can be constructed from the colours found in the image, ascribing each colour a numerical value as we go. In this second method, variously called index mapping or colour mapping, the colour map or CLUT (colour look up table) is embedded in the image data itself. GIF images are a common example of an image file type that uses colour mapping.

Matching Colour Palettes?
There are many standard palettes in computing, for instance the 216 web safe colours, the Windows palette, and the 16 bit RGB true colours. If necessary, a palette can be uniquely defined for a particular image, but the same palette must be used when displaying the image as used when creating the image. If the palettes match, the result will be the same on any computer – at least in theory.
Unfortunately, it’s unlikely. Because of complex imaging techniques in use such as dithering and anti-aliasing, extra pixel information such as transparency, the limitations imposed by the hardware on any particular computer system, and even the brightness and contrast settings on a given monitor, it’s impossible to say with any certainty that an image created on one computer will look exactly the same on any other.
The RGB Colour System
Another method is to use a colour system such as RGB or CMYK, which represent all colours by evaluating the content of primary colours within them. Not to be confused with paint’s primary colours of red, yellow and blue, light’s primary colours are mixed differently and produce different results but the principle is essentially the same.
The RGB colour system combines red, green and blue respectively, while CMYK combines cyan, magenta, yellow and black. The CMYK system is print based, and was developed by printers for printing, though it is used in computers particularly when developing work for print. Monitor colour reproduction, however, is always based on red, green and blue, which makes the RGB system ideal for computer based work.

Notice that in the indexed palette example the colour’s numbers have a preceding 0x. This denotes that they are hexadecimal (base 16, often referred to as hex) numbers. Here too in the RGB system, hexadecimal numbers are also used by default – denoted by the preceding hash (#) character in this case. The reason for using hex is that, when dealing with computer data, it is a good base to use as it’s relatively straightforward for humans to deal with, but it also translates easily into binary – the number system for computers.
In the RGB system, the presence of each primary colour in a given colour is represented as a value between 0 and 255. Using this system, representing red, green or blue is very simple:
| Desired Colour | Red | Green | Blue | Decimal | Hex | |||
|---|---|---|---|---|---|---|---|---|
| Dec | Hex | Dec | Hex | Dec | Hex | |||
| RED | 255 | FF | 0 | 0 | 0 | 0 | (255,0,0) | #FF0000 |
| GREEN | 0 | 0 | 255 | FF | 0 | 0 | (0,255,0) | #00FF00 |
| BLUE | 0 | 0 | 0 | 0 | 255 | FF | (0,0,255) | #0000FF |
The table shows clearly that the colour red, for example, contains a full complement of red light, but no green and no blue, which decimally speaking is represented as (255, 0, 0). More commonly hexadecimal is used, so red becomes: #FF0000. Similarly, green is represented (in hex) as #00FF00, and blue as #0000FF. Notice that even when a number is 0 it is represented as 00, because (and this is the clever part of hex) each character corresponds exactly to a single 4 bit byte and each character pair to an 8 bit byte, which is a basic building block of computer data. This makes translating hex to binary and back very simple (with a little practice), and we’re getting very close now to having a digital representation of our image.
The Bitmap or Raster Image
Whichever method is used, the basic task is to go through each square and turn our image into a grid of numbers. Once that is done, if we take each number in sequence, left to right, top to bottom, and write the numbers sequentially we create a stream of byte by byte data. Taking the first four squares sampled in our RGB example above we create the following:
A17D478C572D6B3915628402
Of course this is already far away from a human readable image, but there is still another step to take. Computer data is binary, so we translate the hex, byte by byte, into binary code. When that’s done, our stream of data now looks like this:
101000010111110101000111100011000101111000101101011010110011100100010101011000101000010000000010
Once we’ve completed this bit by bit data stream for the whole image it can be stored in the computer’s memory. What we have created is an RGB bitmap, and as the word suggests, this is quite literally a map made up of bits that contain the raw data of our image. The computer now has data it can handle, and we have succeeded in creating a digital version of our picture. When it comes to displaying the image, as long as we know the system by which the data was created, which number fits which colour and where for a particular set of image data, the digital information can be translated back to colour to display the image as desired on screen.
Next, we’ll deal with how resolution affects the file size of an image, and how file sizes are kept under control using specialised image file formats. Check back tomorrow!