The Welcome to Setup screen offers the following options:
- To set up Windows XP now, press ENTER
- To repair a Windows XP installation using Recovery Console, press R
- To quit Setup without installing Windows XP, press F3
Press ENTER and then signal acceptance at the subsequent END USER LICENCE AGREEMENT screen by pressing F3.
Then proceed through the following stages of Windows Setup:
1: Partitioning the hard drives
The next screen identifies the Unpartitioned space on the RAID array. Press C to create a partition.
Specify the required size of the partition in MB and pressing ENTER to create it.
We’re going to create separate software and data partitions. When both of these have been created, select the software partition as that into which Windows is to be installed.
2: Formatting the C: drive:
You’ll now be presented with various options (NTFS or FAT, quick or not) for formatting the selected partition.
Select the required option and press ENTER
After the partition has been formatted, the Windows Setup procedure will resume.
3: Installing Windows
You’ll first be invited to insert the ITE IT8212 ATA RAID Driver Diskette into drive A:. Do so and press ENTER.
The system reboots and continues with the installation of Windows XP. Refer to the How to do a clean installation of Windows XP tutorial for detailed instructions on this.
Once Windows XP has been successfully installed, the data partition can be formatted via My Computer, by right-clicking the D: drive and selecting Format.
Note that using separate partitions for software and data adds a valuable additional level resiliency. In the event that some badly behaved item of software renders the C: partition unusable for some reason, leaving no option other than a clean reinstallation of Windows, then at least this can be done in a way that completely preserves your user data, the data partition being entirely untouched by this process.
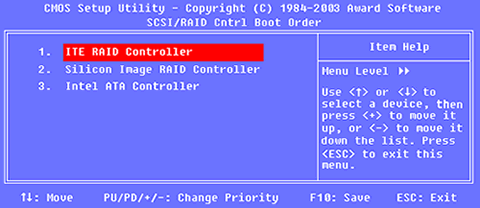
You may also want to edit your system BIOS so as to select the appropriate boot order for your IT8212 RAID Controller.
Do this via the Advanced BIOS Features category, selecting the SCSI/SATA/RAID Boot Order entry ……….

………….. and adjusting the order as appropriate.
- RAID tutorial – the benefits of using RAID
- RAID tutorial – preparing for the installation
- RAID tutorial – connecting the hard drives
- RAID tutorial – configuring a RAID array installation
- RAID tutorial – installing the drivers
- RAID tutorial – installing Windows on the RAID drive
- RAID tutorial – maintaining the RAID array