A Windows 98 Startup Disk is a considerable improvement on that produced by earlier versions of Windows, not least because it contains a number of generic, real-mode ATAPI CD-ROM and SCSI drivers that allow CD-ROM devices to become available when running Windows 98 from the Startup Disk. However, it is not guaranteed that one of these drivers will work with any CD-ROM device. Rather, they are provided as a replacement in the event that the real-mode drivers that came with your CD-ROM are unavailable. If you’re unlucky, and your CD-ROM drive doesn’t work with any of the generic drivers on the Windows 98 Startup Disk – or if you don’t want to take the chance that it will – you can actually add the specific real mode driver for your drive to the disk.
Real mode refers to an operating mode of x86 chips that replicates the memory management used by 8086 or 8088 chips, characterised by an absence of memory management or memory protection features and limiting the processor to 1MB of memory. MS-DOS runs in real mode, and the phrase is often used to describe 16-bit MS-DOS device drivers.
The biggest problem is doing this is often locating your CD-ROM drive’s real mode driver in the first place. If you’re lucky, you’ll have this either on a floppy disk or CD-ROM that came with your drive. If you haven’t, and the machine on which you’re planning to do the clean reinstall on is still operational, you may be able to find the driver you’re looking for there.
The place to look is the config.sys file in the root folder of your C: drive. If this contains a line that looks something like …
device=c:cdromgscdrom.sys /d:mscd000 /v
… and the gscdrom.sys file is where it says it is, you’re in luck.
If you can’t locate the real mode driver you need on floppy or CD-ROM media or on your hard drive, the next place to try is the Internet. To do this, you’re first going to have to identify your CD-ROM drive model. To do so, you need to find out precisely what model of CD-ROM drive it is that you have.
To do this you’ll need to remove its securing screws and the EIDE and PSU cables plugged into the back of the drive. Slide the drive out of its bay and you ought to be able to find a sticker somewhere on its casing that identifies its unique FCC ID.
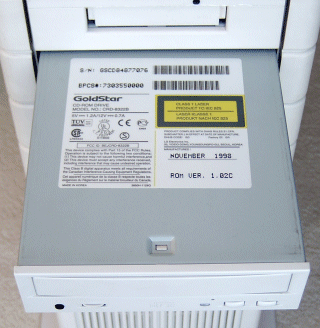
We’ll use BEJCRD-8322B as an example of how to locate a download of the associated real mode driver and how to add it to your Windows 98 Startup disk.
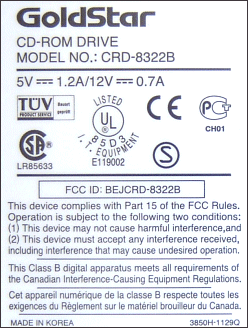
Details about any equipment displaying such a label label can be found in the Federal Communications Commission database:

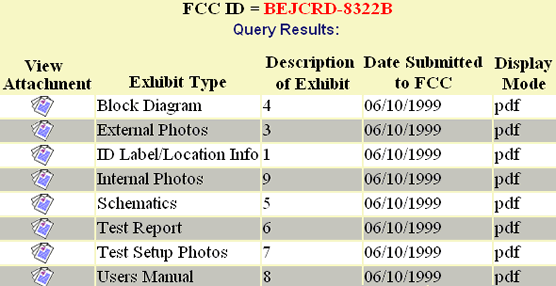
Type in the FCC ID as shown above and, so long as the database has a record of it, you’ll be able to access all sorts of useful product documentation:
However, for information concerning the availability of downloadable drivers, you’ll need to visit a specialist driver site such as missingdrivers.com. Click on the CD-ROM Drivers category to locate the manufacturer you’re after:
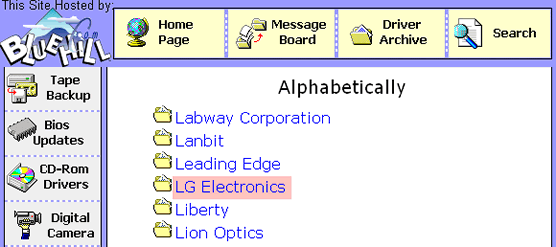
Click on it and if you’re even luckier, you’ll see the model number you’re looking for:
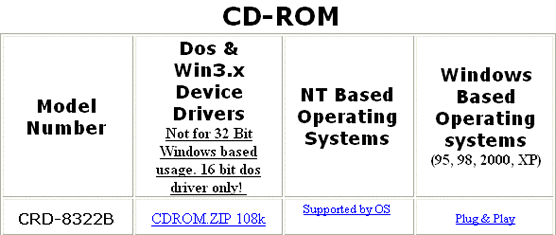
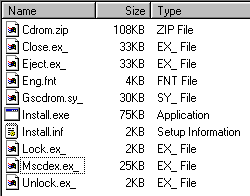
The real mode driver is the one identified as being a 16 bit DOS driver. When you download and unpack the CDROM.ZIP file, you’ll have a set of files like these. The Gscdrom.sys file is the real mode driver.
What you need to do now is copy Gscdrom.sys and the associated unzipped driver files to a folder on your Windows 98 Startup Disk and edit its Config.sys and Autoexec.bat files.
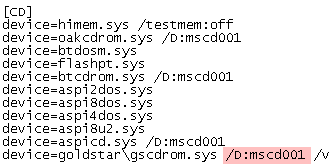
The portion of the Config.sys file that you’re interested in are the lines marked as [CD], where the set of generic CD-ROM drivers are referenced.
Using a text editor such as Wordpad, add a line that references the gscdrom.sys file.

The /D:mscd001 /v part of the line renames the driver when it is loaded into memory. The important thing here is to ensure that the Autoexec.bat file references this by the same name as the Config.sys file.
Your Windows 98 Startup Disk should now be guaranteed to work with your CD-ROM drive.
- Win98 Installation Planning
- How To Create A Windows Start Up Disk
- Installing Windows 98 – Getting Your CD Drive to Work for Installation
- How To Create A FAT32 Partition on Your Hard Drive
- Win98 Installation Drive Formating
- Win98 Installation
- Win98 Installation Phase 1
- Win98 Installation Phase 2
- Installing Windows 98 – Copying the Windows Files to Your Computer
- Restarting Your Computer After Installing Windows
- How To Do a Clean Installation of Win98 – Phase 5: Setting Up Hardware and Finalising
- Installing Windows 98 – Upgrading to Win98SE
- How to Update Microsoft Windows with Patches and Service Packs
- Win98 Driver Installation
- Win98 Installation Tuning