At times a system can become completely unusable and you may have to resort to extreme measures to get the computer back to a working state. Sometimes all hope is lost and you have to do the dreaded reformat. That means saving everything you can and wiping the drive back to its pristine, factory state. However, there is one other method that you should try before you take that Hail Mary. It is called the System Restore. The System Restore has been around for quite some time in Windows. It made its debut in Windows ME. The tool takes a snap shot of your system registry and system files and certain junctions. If Windows becomes damaged or problematic, it may be possible to revert to a certain System Restore point using the utility. System restore points are created automatically during certain system events. It could be when programs are updated or installed, drivers installed or Windows updates are applied. They can also be created manually before a big systems change. This is good practice if you are worried that a change you make to Windows could have negative consequences. This lesson will teach you how to create one.
Is System Restore Turned On?
The first thing you need to do is to check if System Restore is even turned on. There are a couple of different paths to take to get to the place to edit it, but we will be taking the following path: Click on the Start Button and then Right Click on Computer. In the box that appears click on Properties
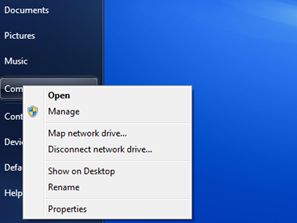
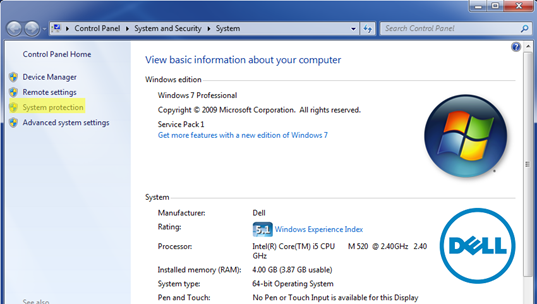
You will be presented with the following screen where you will need to select System Protection
Once in the System Protection Screen, you will need to select the Configure button
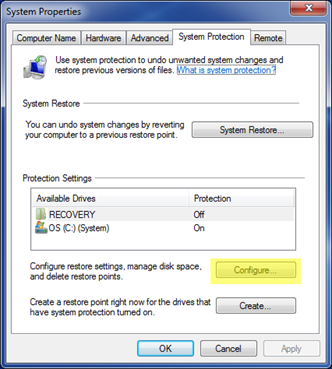
Then you will need to make sure that System Restore is enabled
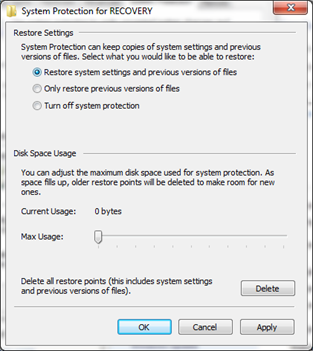
Create the Restore Point
Once you have verified System Restore is turned on, you can click on the OK Button to go to the previous screen.
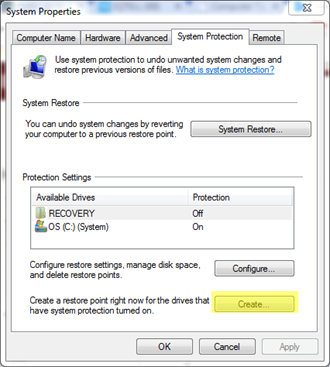
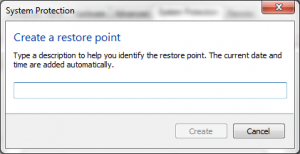
Next you will name your restore point. Try to name it something that will correspond with the activity you are doing. For example, if you are about to install DirectX, call it “Preinstallation of DirectX”.
After you name it, click on Create to start the process
After a few moments, you will receive a notification the restore was successful
Click on the Close button to go to the System Protection Tab.
Verify Restore Point
To verify the restore point is available, click on the System Restore button
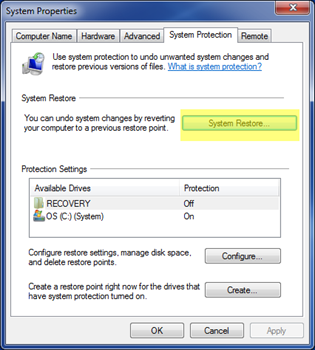
You will come to a screen where you can select restore points. You will notice that there are already some automatic restore points generated. This means the system is creating restore points at times it see fit. But, if you click on the option to “Restore a Different Restore Point” you will be taken to another window where you will see a list of the ones to choose from.
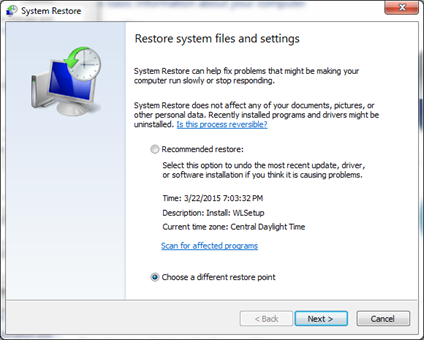

As you can see in our example, we have a restore point called Test, and it is a Manual restore point. If you click on the Next button then you will be walked through a wizard of actually rolling back to that point in time in Windows. Hopefully, this will make you more comfortable using this useful tool inside Windows. It can save you hours of trouble in rebuilding a PC from scratch it is successful.
