We’ve already looked at some of the means to operating your server, but now we’re actually going to look at how to operate it. Working with Linux as the dedicated server’s operating system, we’ll cover some basic steps including logging in, creating a user account, familiarising ourselves with the file system, and getting to grips with some useful Linux commands. If you’re considering getting a Linux server, it will hopefully help show you that there is little to fear. If you already have a server, it will help you to get things up and running.
As a bonus, if you are thinking of running a Linux webserver in your home for live web access, development purposes, or simply to learn, this article will help you there too. You just don’t need to worry about connections!
For connecting to your server using Windows we’ll use PuTTY, and from Linux we’ll use SSH. What you’ll need in either case is a username and password, which will have been provided to you by your host company when you leased the server. The chances are that you will have only been given a username of root, which is fine for now, though we’re going to add another username and password to the system ourselves. The one that you create will be the one that you should use by default in the future.
Logging in using Windows and PuTTY
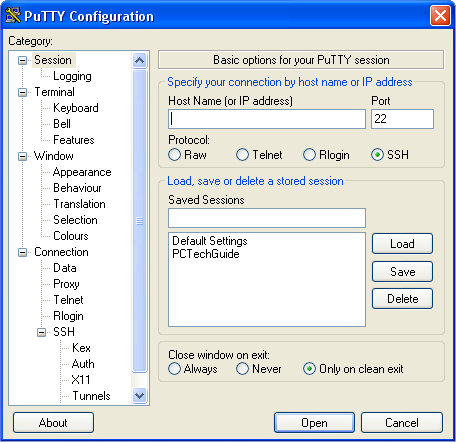
When you’ve installed PuTTY, fire it up and you’ll see a screen something like this.

In most instances the PuTTY defaults will work fine, so you need simply enter your IP address, or site URL, into the Host Name field. If you want to, click Save so that you don’t need to enter it next time you run the software. Of course this is especially useful if you need to configure PuTTY in a particular way for your connection.
When you click Open, you’ll be presented with a window similar to the command window, with a simple prompt that says, login as:. Here you enter the username that you’ve been provided, probably root, and you’ll then be asked for the password. Type it in carefully, and note you won’t see the characters that you type on the screen. This is normal, just press enter when you’ve typed it in. If you’ve got it right, you’ll be presented with a statement along the lines:
Last Login: (date/time) from (your Internet IP information)
Then you’ll get a prompt and a cursor, at which point… you’re in! You’re now in control of your server.
Logging in using Linux and SSH
Connecting from Linux is even simpler. From the command prompt, type:
$ ssh (username)@(ip address)
Here, username is the user name given to you by your host, and ip address is the ip address of your server. So, if the user name is root, and your server’s IP address is 192.168.0.1 (which is an address typical of a local network server), you’d type:
$ ssh
root@192.168
This e-mail address is being protected from spambots. You need JavaScript enabled to view it
.0.1
You’ll then be prompted for your password. Enter it carefully, as you won’t be able to see what you type. Hit enter, and if you entered it correctly, you’ll see the last login information, the prompt, and you’re in.
- Advantage to Shared Web Hosting
- Shared Hosting Issues – Shared Bandwidth and Server Resources
- The Ins and Outs of Dedicated Web Hosting
- When To Move To A Dedicated Server
- Choosing a Dedicated Server for your Website
- Managing and Operating a Dedicated Server Over the Internet Using Online Control Panels
- Accessing the Linux Operating System on Dedicated Servers with PuTTY or SSH
- How to Create a Secure Password
- Using Sudo for Super User Access to Root Privileges in Linux
- The Linux Directory Structure
- Linux Commands for Navigating and Viewing Directories
- Creating, Moving, Renaming and Copying Files and Directories in Linux
- Find, View and Delete Files and Directories Using Linux Commands
- Using vi to Edit Text Files on A Linux Dedicated Server