You first need to remove or disable any existing audio components.

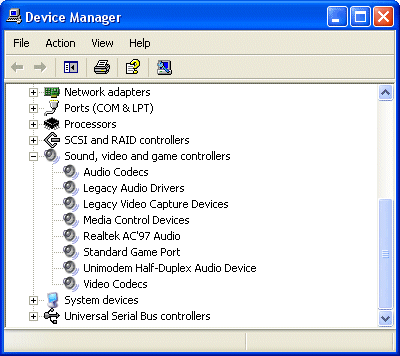
Under Windows XP, invoke Device Manager by right-clicking My Computer > Properties > Hardware > Device Manager.
Expanding the Sound, video and game controllers item indicates there’s no add-in sound card, just on-board audio.
You’ll need to disable this before installing your new add-in card. While this sometimes requires setting a jumper on the motherboard, it’s more usually done usually via the system’s CMOS Setup routine.
Enter this as described in your system’s documentation (normally by pressing the DEL, F1 or F2 key. Go to the Integrated Peripherals category of the BIOS Setup and disable support for on-board audio (often shown as AC97 Audio).
Motherboards with integrated audio chips actually emerged quite early in the life of PCI, but failed to take off. However, with CPUs becoming ever more powerful, Intel put its considerable weight behind efforts towards on-board audio. Revision 1 of the company’s AC’97 standard for PC audio circuitry debuted in the mid-1990s, with the elimination of ISA in the audio subsystem as one of its stated goals. It was evident that it was also an important step in the trend towards integration.
The AC’97 specification consists of two components:
- a digital controller (AC-Link), which is built into the Southbridge or I/O Controller Hub (ICH) of a chipset
- an AC’97 codec, the analogue component of the architecture
the former being an obligatory chipset feature. By separating analogue and digital functions onto different chips and at the same time merging audio and modem capabilities, the AC’97 specification offered the prospect of integrated the audio and modem subsystems.
Many motherboards now came with on-board audio, either integrated in the Southbridge/ICH chipset itself or in the form of an add-on IC from a third party manufacturer. Whilst sacrifices – both in terms of features and sound quality – obviously have to be made as a result of the limited space available by 2003 on-board audio was a match for many analogue-only sound cards and arguably capable of providing sound that would satisfy all but the hard core gamer.
Generally, on-board audio implemented via add-on ICs are of higher quality than the integrated AC’97 audio found in chipsets. The sound quality of the integrated audio depends more on the analogue part – the AC’97 codec chip – than the digital AC-Link. The way the standard is constructed gives plenty of scope for differing implementations, and by 2003 the codec used by the overwhelming majority of motherboard makers was the Realtek ALC650. An 18-bit, full duplex AC’97 2.2 compatible stereo audio codec specifically designed for PC multimedia systems, the ALC650 incorporates proprietary converter technology to achieve an impressively high signal-to-noise ratio of greater than 90 dB.
NVIDIA – the leading graphics processor manufacturer – entered the fray in 2001 with their innovative nForce multimedia chipset, an adaption of the technology the company had developed for Microsoft’s X-box games console. By integrating a specialised audio processor unit (APU) into the Southbridge of the nForce chipset, NVIDIA have succeeded in producing an on-board audio subsystem capable of rivalling many of today’s add-in sound cards. As of mid-2003, the nForce chipset was only available for motherboards designed to work with AMD processors.
The latest version of the AC’97 specification – Revision 2.3 – was released in the spring of 2002. In the autumn of the following year Realtek announced what it claimed to be the world’s first eight-channel AC’97 Rev 2.3 audio codec, in the shape of its ALC850 product.
If, on the other hand, you currently have a sound card, you’ll need to remove it and its drivers. It’s important that you do the latter first.
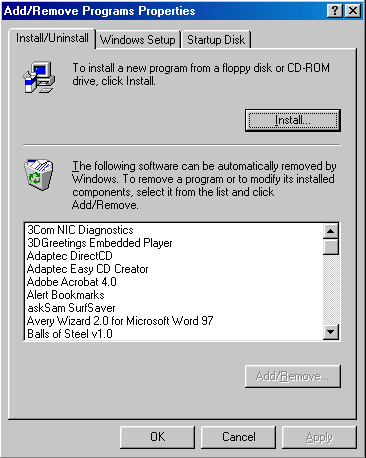
The following Windows 98 screenshots show you how to do this.

If your current sound card is relatively recent, the odds are that you’ll be able to remove its drivers via Add/Remove Programs. The older the card, the less likely this’ll be the case.
Go to Add/Remove Programs and look for any entries that relate to your current sound card. Under Windows 98 you reach this via Start > Settings > Control Panel > Add/Remove Programs. Select the Install/Uninstall tab, select any relevant entries and click on Remove.
In fact, in this case there’s no sign of the current card’s drivers.
Whether or not you removed any sound card related software via Add/Remove Programs, you should now check Device Manager.
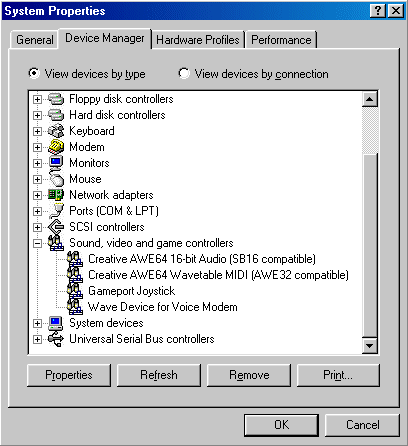
Under Windows 98, right-click My Computer, select Properties and then the Device Manager tab.

Expand the Sound, video and game controllers item and select and remove all items related to your current sound card, one at a time.
In this case we’re going to remove the two Creative AWE64 items.
Having ensured that your current sound card’s drivers have been removed, you can now physically remove the card.
Power down your system, unplug the power cord from the wall outlet and remove the PC’s cover. It’s important that you free yourself of static electricity before you touch any of the PC’s internals. You can do this by touching a grounded metal object. Better still, you should wear an anti-static wrist, clipped to a grounded metal surface.
Disconnect all cables connected to the sound card – both internal and external – making a note of where each goes. Remove and set aside the screw fixing your current sound card and carefully remove the card.
- Disabling and Uninstalling Soundcards
- How To Install a New Sound Card In Your PC
- Soundcard Optical Connections
- How To Connect Speaker Systems to Your Sound Card
- Connecting a Creative Audigy Soundcard to Peripherals
- Soundcard Consumer Info
- How To Install Drivers For Your Creative Sound Card
- Updating Your Creative Soundcard Drivers
v v v v
thanks